Home › Forums › Photography Showcase › how can i improve, ocean water, how many seconds and some problems
- This topic has 9 replies, 4 voices, and was last updated 10 years, 6 months ago by
cameraclicker.
-
AuthorPosts
-
October 15, 2013 at 1:33 am #14326
jermyster
ParticipantHi guys
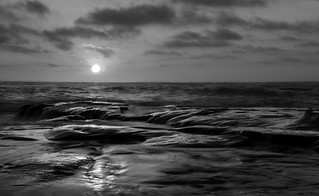
I tried taking some photos of the tide pools in San Diego area. any advice on how to shoot this next time to make it better would be great.
is the horizon line too low? should i have opened the shutter longer than 3 seconds? etc. Although this is my first water shoot, no need to hurt my feelings, the harsher the more it pushes me to be better.
thanks in advance
 October 15, 2013 at 1:37 am #14327Participant
e
October 15, 2013 at 3:47 am #14339Bill
ParticipantWhat are you doing in my part of town? just kidding. La Jolla is always a nice area to shoot.
This area you are shooting looks to be just South of the Children’s Pool, correct?Well the longer you open the shutter, the more misty the water will look. You’ll lose the finer details in the waves due to the longer exposure, but it will look more mystical if I had to put a label on it.
According to your settings, the shutter was only open for 1″ @ f/22, is this right? I “assume” you were using a ND filter or similar shooting directly into the sun?
I made a tiny quick edit [4 minutes] using a screenshot, so I am a little limited to what I could do. I would stick with color on this, there is too much similarity in color to really do it any good, but that is just my opinion.
Maybe a different vantage point, leading lines or some dramatic textures to make the image pop.
October 15, 2013 at 2:17 pm #14351ParticipantHi Bill I was coming back from the zoo and stopped by La Jolla. close on the settings. f22 ans 2 seconds. I had a cheap nd filter and polarizer I got from Frys. Did I compose right? Do I need to use a gradient nd filter? Since you’re there… next time you shoot there can I watch what you do? also saw your edit.wow how did you turn my phot from crap to awesome!
Thanks Bill! jer
October 15, 2013 at 7:45 pm #14363ParticipantHey Jer – I have no problem if you are down this way if you want to meet up and do some shooting. I sent you an email through Flickr, it forwards mail to me to my other email address. I like keeping a little anonymity,to keep the freaks at bay, lol.
Normally, for beach shots, shooting directly into the sun, I would say you can’t go wrong with using a graduated ND filter, but it all depends on the scene setting that you are shooting of course. I would probably not use the ND filter and a polarizer together as they may create some chromatic aberrations or fringing. The polarizer bends some of the light and can create some strange effects, compound this with a ND filter and possibly a UV filter that most use as a protection filter, you really increase the chance of this happening.
As for the editing that I did, honestly it was about 3 or 4 minutes from a screenshot that I took using ACR nothing else. All I did was adjust the color temp, add a little contrast, sharpen a bit and touch of fill light, oh and a ACR version of a graduated filter, that was it, nothing more. With a RAW version, it could have turned out much better, than the 758KB jpeg version.
October 16, 2013 at 12:24 pm #14397cameraclicker
ParticipantThis is going pretty much the same way as Bill’s edit
http://www.flickr.com/photos/54048679@N07/10312758994/
For sky, a CP filter works best at an angle to the sun. It would cut glare off the ocean though, if you were getting too much reflection. A split ND filter or a graduated one would be good for that scene. I don’t bother with them because my sunset is full of apartment buildings.
October 18, 2013 at 9:28 pm #14522Participantwow you guys are really awesome, thanks clicker.
the cp. how much of an angle, does it work well if the sun is directly overhead or at direct angles to the camera?
October 18, 2013 at 11:01 pm #14524ParticipantA CP filter cuts light reflected by non-metalic surfaces. It achieves this by blocking all light a little, and polarized light a lot. You can rotate the filter to align it, and the effect increases with proper alignment, so you can rotate the filter to have almost no effect, through having a strong effect. It is useful for seeing through windows, or into water, and for making leaves and sky more saturated.
As you swing off the axis of sunlight, the effect will increase until you are perpendicular to the axis. I haven’t considered it, or paid enough attention when using it, but if the sun were right overhead, and you are shooting horizontally, presumably north, south, east or west would all be perpendicular to the sun, so it should work pretty well. I use lens hoods most of the time, they interfere with turning the filter, so I only use the filter when I really need to, and not so much for deeper blue sky.
Consider this scene near the Capilano Suspension Bridge, in North Vancouver, taken without a filter
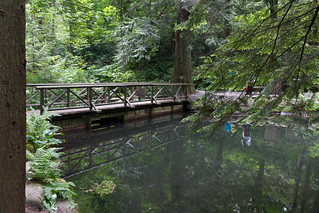
… and the same scene again with a CP filter adjusted to reduce reflection, 4 seconds earlier
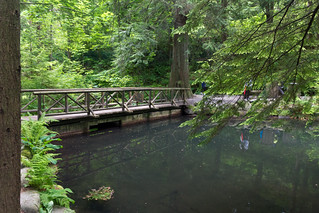
I don’t think I have any before and after of the sky, but I hope this helps highlight how the CP filter can help.
October 19, 2013 at 11:08 am #14539nesgran
ParticipantA CPL is pretty good at cutting through haze as well which is sometimes handy if you shoot something at a bit of a distance.
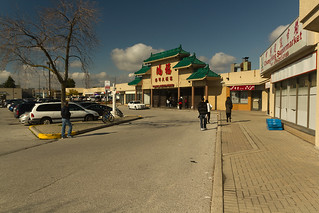
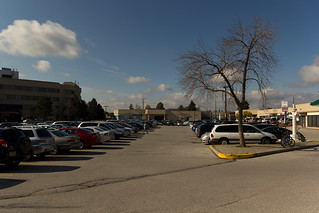
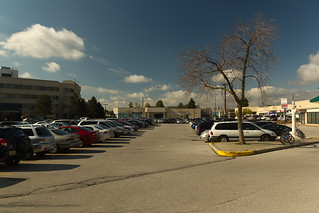
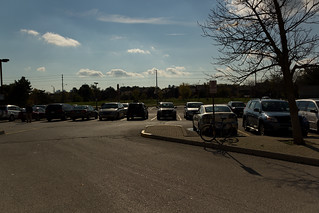
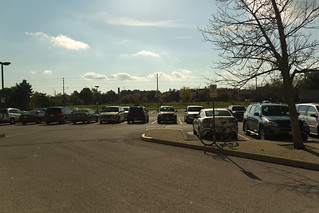
October 20, 2013 at 3:04 pm #14579ParticipantI was waiting for a seat at the restaurant, and the sky was nice and blue with some puffy white clouds. Here are some photos from the parking lot. As previously, a photo was taken with the CP filter, then the filter was taken off and a second photo was taken.
Group 1, away from the sun, No filter:

CP filter:
Group 2, almost perpendicular to sun, no filter:
CP filter:
Group 3, almost into sun, no filter:
CP filter:
In the third group, the photos look backwards to what you might expect from the first two groups. There is a lot of reflection from the asphalt, without the CP filter, the camera’s meter sees the extra light and reduces the exposure. With the CP filter in place, the reflection is reduced, so the meter lets in some extra light which makes the sky brighter.
-
AuthorPosts
![[4 minutes] using a screenshot,](http://i.imgur.com/ERUhsdK.jpg)
- You must be logged in to reply to this topic.